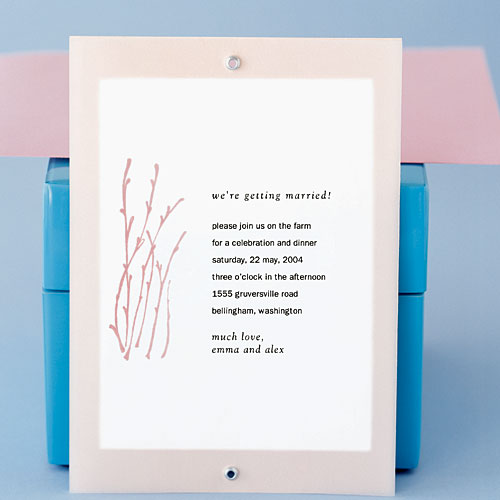
Wedding invitation No. 1: The layered look
This invite has 3 layers—a sheet of printed vellum; a small, rubber-stamped card; and a large colored card. The vellum is attached to the cards with metal eyelets. It costs about $100 to make 50. You’ll need:
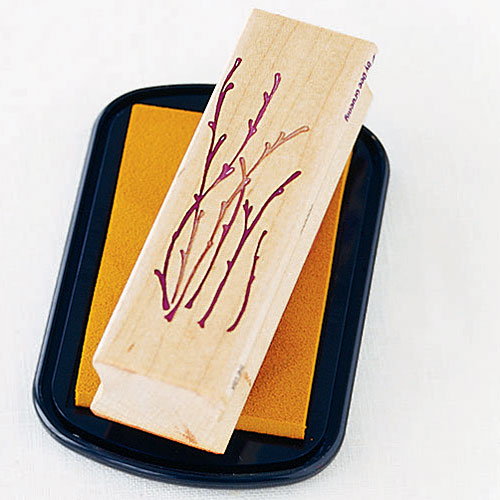
- Rubber stamp
- Colored stamp pad
- 50 3½- by 4 7⁄8-inch white flat cards
- 50 4½- by 6¼-inch colored flat cards
- Mini Glue Dots
- 25 8½- by 11-inch sheets of clear vellum suitable for printing
- Craft knife, metal ruler, and cutting mat
- 1⁄8-inch hole punch
- Eyelet starter kit
- Hammer
Wedding invitation No. 1: The layered look
Stamp pads are available in pigment and dye styles. Pigment pads produce a printed-looking stamp, and dye pads create more of a watercolor look.
A good online source for rubber stamps is Stamp Francisco (360/210-4031).
Wedding invitation No. 1: The layered look
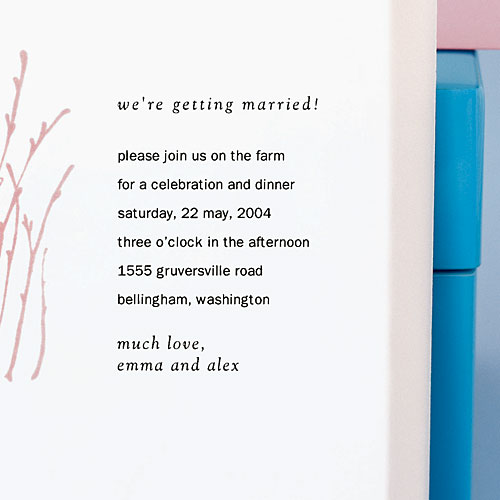
Once you’ve decided what to say, type it into a word-processing program and play with different fonts, sizes, and spacing to get the right look. Remember to leave space for any stamped design that will show through from the middle card.
Print or photocopy your invitation text horizontally on the vellum (you can print two on one sheet of vellum).
If you don’t have a computer or a high-quality printer, take your text and paper to a copy shop.
Wedding invitation No. 1: The layered look
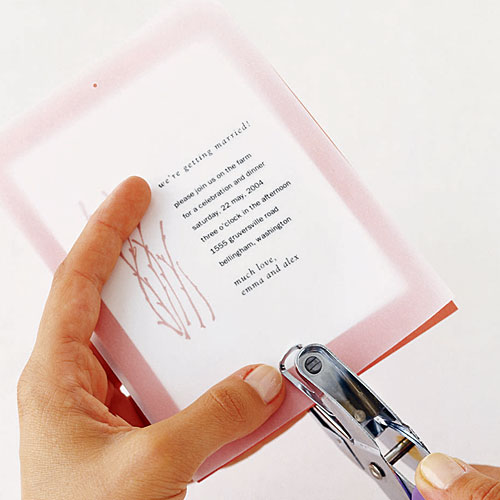
4. Center the vellum on the card, then use the hole punch to create one hole at the top and one at the bottom.
5. Push an eyelet through the top hole, then turn the card over. Put the setting tool into the back of the eyelet and tap lightly with hammer to secure (three taps should be sufficient). Repeat this step at bottom of card.
6. Slip your layered cards into 4¾- by 6½-inch envelopes (about $15 for 50).
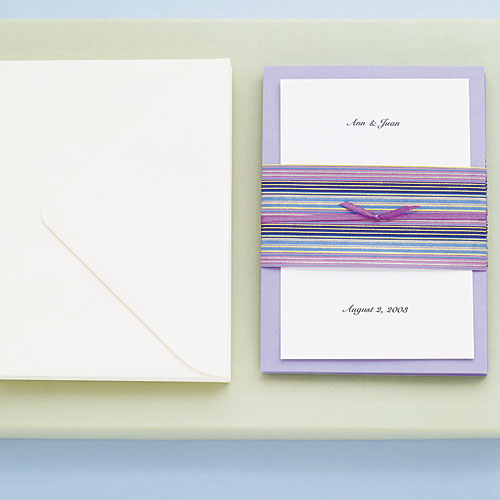
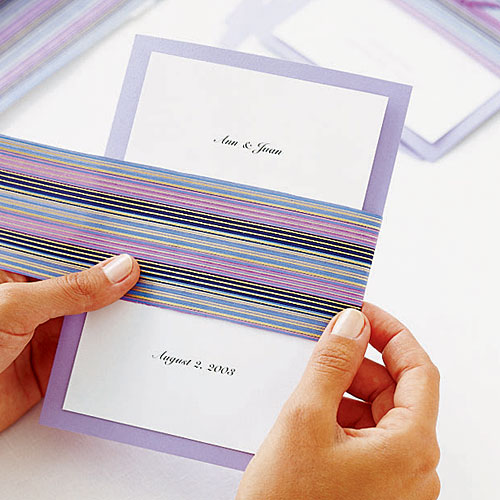
Wedding invitation No. 2: The wrap
This technique dresses up a standard card with a decorative paper cuff and ribbon. It costs about $110 to make 50. You’ll need:
- 50 3½- by 4 7⁄8-inch colored flat cards
- 50 5- by 7-inch flat cards in a contrasting or complementary color
- Mini (thin) Glue Dots (available at craft stores)
- Craft knife, metal ruler, and cutting mat
- 17 8½- by 11-inch sheets of colored paper
- Scissors
- 21 yards of ribbon
Wedding invitation No. 2: The wrap
2. Center small card on large card and secure it with one mini Glue Dot under each corner.
3. On the cutting mat, with the metal ruler as a guide, use a craft knife or paper cutter to slice colored paper into fifty 2½- by 10-inch strips.
4. To form a belly wrap, fold one strip of paper around each invitation and secure strip to itself with two Glue Dots.

Wedding invitation No. 2: The wrap
Insert into 5¼- by 7¼-inch envelopes (about $18 for 50).
Wedding invitation No. 2: The wrap
Address the envelopes before stuffing them. Then insert your invitation into the envelope with the text facing the flap side.
To create a reply card, buy 50 postcard-size flat cards in a coordinating color (about $7 for 50). Print your RSVP information on one side and your return address on the other.
Slip your reply card and any additional wedding information (such as a map and directions) behind the invitation.
Take completed invites to your post office and have them weighed to ensure correct postage. Visit www.usps.gov to look up zip codes and rates.


%C2%A0%20Let%20small%20card%20dry%2C%20then%20center%20and%20secure%20it%20to%20large%20colored%20card%20with%20one%20Glue%20Dot%20under%20each%20corner.%3C%2Fp%3E%3Cp%3EStamp%20pads%20are%20available%20in%20pigment%20and%20dye%20styles.%20Pigment%20pads%20produce%20a%20printed-looking%20stamp%2C%20and%20dye%20pads%20create%20more%20of%20a%20watercolor%20look.%3C%2Fp%3E%3Cp%3EA%20good%20online%20source%20for%20rubber%20stamps%20is%20%3Ca%20target%3D%22_blank%22%20href%3D%22http%3A%2F%2Fwww.stampfrancisco.com%22%3EStamp%20Francisco%3C%2Fa%3E%20(360%2F210-4031).)
.%3C%2Fp%3E%3Cp%3EIf%20you%20don%E2%80%99t%20have%20a%20computer%20or%20a%20high-quality%20printer%2C%20take%20your%20text%20and%20paper%20to%20a%20copy%20shop.)
.%20Repeat%20this%20step%20at%20bottom%20of%20card.%3C%2Fp%3E%3Cp%3E6.%20Slip%20your%20layered%20cards%20into%204%C2%BE-%20by%206%C2%BD-inch%20envelopes%20(about%20%2415%20for%2050).)
%20Glue%20Dots%20(available%20at%20craft%20stores)%3C%2Fli%3E%3Cli%3ECraft%20knife%2C%20metal%20ruler%2C%20and%20cutting%20mat%3C%2Fli%3E%3Cli%3E17%208%C2%BD-%20by%2011-inch%20sheets%20of%20colored%20paper%3C%2Fli%3E%3Cli%3EScissors%3C%2Fli%3E%3Cli%3E21%20yards%20of%20ribbon%3C%2Fli%3E%3C%2Ful%3E)
.)
.%20Print%20your%20RSVP%20information%20on%20one%20side%20and%20your%20return%20address%20on%20the%20other.%3C%2Fp%3E%3Cp%3ESlip%20your%20reply%20card%20and%20any%20additional%20wedding%20information%20(such%20as%20a%20map%20and%20directions)%20behind%20the%20invitation.%3C%2Fp%3E%3Cp%3ETake%20completed%20invites%20to%20your%20post%20office%20and%20have%20them%20weighed%20to%20ensure%20correct%20postage.%20Visit%20%3Ca%20target%3D%22_blank%22%20href%3D%22http%3A%2F%2Fwww.usps.gov%22%3Ewww.usps.gov%3C%2Fa%3E%20to%20look%20up%20zip%20codes%20and%20rates.)